
My first descent home-oven baked pizza (finally!)
It has been a massive source of frustration for me that, despite being able to produce pretty descent sourdough loaves, I have abjectly failed, so far, to make any remotely good pizzas and focaccias.
Even as a kid I remember trying to make pizzas and being so massively disappointed with the biscuity results.
Every time I would come across some new technique or method that seemed to me to provide some kind of logical 'fix' for what I was thinking the underlying problem might be, I would try it, but still, that elusive soft and puffy but at the same time crunchy base would elude me.
My Italian wife, eager to prevent my next disappointment, would tell me that it was not my fault and that without a proper pizza oven no one can make descent pizza, that's why in Italy everyone buys them from the pizza shop!
But still, despite the recurring disappointments, my baker's curiosity (and pride) would never let me give up, much to my family's growing impatience with my, in their eyes, futile attempts.
I was becoming more and more convinced that the problem was not in the dough or its shaping, but the oven and baking and finding a way to make the home oven mimic a proper pizza oven, even if it cannot reach the kind of temperatures a pizza oven can reach.
The latest 'hack' for how to do this, which rekindled my flagging but not entirely lost enthusiasm/curiosity, was a YouTube video by some Italian guys (Malati di pizza) who come up with and try all sorts of ways for making pizza at home.
The basic idea behind their most successful bake in a home oven was to create in the top of a home oven, a separate oven section in which a pizza oven could be simulated. They used two pizza stones (one thick ceramic, the other a thinner more stone like) on the top but one oven rack in the oven, to completely separate the upper chamber from the rest of the oven. The stones needed to reach to the very walls of the oven, both on the sides and from back to front, so as to create a high temperature section at the top with the temperature at the bottom part being much lower. They even disconnected the oven thermostat probe from the top of the oven and let it hang down into the lower chamber.
The idea was to use the grill-only function to heat the top artificial chamber to a much higher temperature than the normal range of the oven and then bake the pizza on the extremely hot stone and close to the grill, simulating the way pizza ovens work.
Defying the groans and rolling of eyes of my family when I told them that ' this time it would come out nice' I decided to give it a try. Made a 3h poolish with active yeast powder and then a 70% hydration final dough with all-purpose flour that was left to become super active and given many S&Fs and laminations in the process. I was not committed enough to move the temperature probe, but was able to create a mini sub-chamber in the top of the oven using some leftover tiles from some home decorating that were the right size to form a wall-to-wall ceramic base for the sub-chamber and cracked up the temperature of the oven to max on grill-only function and left it to warm for a long time, until it switched off (I assume at the top temperature of the oven). Meantime, I formed the base, brushed with EVO, chopped up some tomatoes from a tin, and mixed with some salt, pepper, and oregano and left the base to rise on some tin foil. Once the oven was at the highest temperature it would go to and switched off, I spread the tomato on to the base and put it into the, by now, very hot upper chamber. Put the timer for 5min and chopped up some mozzarella to sprinkle on top once the tomato had dried a little.
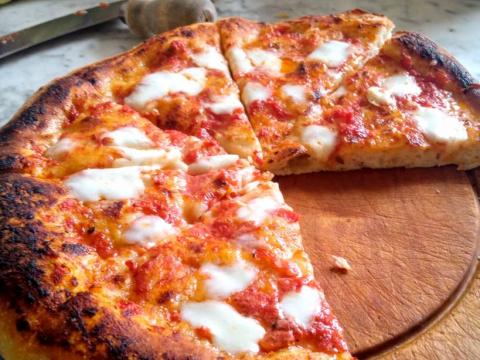
I could see it all growing and puffing up almost as soon as I put it in and by the time I opened the oven to put the mozzarella on, the base and tomato looked really great. 3min later (8min in total), I took it out and let it cool on the chopping board before cutting it, bit into the slice I had just cut and ... there it was! An almost perfect home baked pizza that had so long eluded me! The picture shows what it looked like.
Despite the good appearance, the family were still skeptical, to say the least, but as soon as they had bitten into the first slice, they all started to nod and smile and grudgingly admitted: 'this time you have finally got it'! My teenage son then proceeded to eat the entire remaining pizza himself!
I have to say, it was a really nice feeling! These breakthroughs are what make me like baking so much I think. When, after all those experiments and disappointments one finally produces a successful result, it is a really good feeling.
Of course, now the task of optimization begins! I think a slight tweaking of the temperature trajectory will yield an even better results. It was a little too pale underneath, so I think I will let the tiles warm up much longer at full temperature and then reduce the oven temperature a little (220C?) after I put the pizza in so it cooks slightly more underneath before the top is ready. But, apart from that, I am pretty sure that this will work from now on.


Comments
You're a real champ for not giving up and continuously trying! I really admire people who are dedicated to their work. And by the way, the pizza looks amazing
https://youtu.be/7Lb4XH0V6tA
Oven setup is near the end of the video.
Congratulations on figuring out your home oven for pizza. Your pizza looks amazing.
When I want to have a thin crust Naples style pizza I bake them in a cast iron skillet that heats up with the oven. I place my baking steel on the second highest rack and preheat at 550°F on roasting. Once the pizza is set in the blisteringly hot skillet, it is placed on the baking steel and baked for a total of about 6 mins.
For a Roman pizza with a thicker crust I preheat the oven at 500°F with the baking steel on the lowest rack. Once the pizza is loaded onto the steel I drop the temperature to 425°F, baking for 10 mins with just the sauce on the dough, removed and the rest of the toppings applied and then the pizza placed back on the baking steel to finish baking about 20 mins more.
Benny
Thanks Benny
After a long time I realized that the oven/baking part is the critical element with pizza.
So your set-up uses the skillet in place of the tiles I have used if I understand correctly?
I did try something similar with a heavy and large stainless steel pan I have, but it was not as good as the tiles.
The problem I have is that my oven is very dry as I realized it has vents at the very top of the back that are permanent even if quite small.
I get away with it with the loave thanks to the dutch oven, but hadn't found a way to deal with the problem with large flatbreads.
The top sub chamber seems to do the trick. It just occurred to me that this sub chamber may actually be above where the small vents at the back of the oven are, which may also help explain the good results with this method.
I always bake bread/pizza whether it is on parchment paper, in a pan or in a dutch oven on my baking steel. I always want that heat sink on the bottom to really get the oven spring going, that includes when I bake pizza in a cast iron skillet. When I do Roman pizza I bake those on a cookie sheet, that again goes on the baking steel.
Yes, oven set up is extremely important for pizzas as it is for bread and getting your oven figured out is more than half the battle.
Benny