
Please help me improve my 100% sourdough rye bread - "gumminess" and top of loaf caving downwards
Greetings everyone. I am a novice 100% sourdough rye bread baker and hope to gain some insight from those more experienced on how to improve. I have benefited from reading some other posts and appreciate the knowledge here. I am wondering in particular where I can improve on the shape, as the top of the loaves cave in quite a significant amount, and also the internal gumminess. Any other feedback certainly is welcome though.
I am baking with very well seasoned Lodge cast iron loaf pans and my starter varies but for the most part seems to be great - sometimes it has a sort of champagne and fruity smell; it is pleasant. I use only 100% organic whole “wren’s abruzzi” dark rye flour for both the starter and the bake. It is also worth mentioning I do not measure ingredients at all - it is more fun this way! I feel like I get to “know” my starter and get a better feel for the process when I don’t measure. Also I prefer intuitive methods and it just feels more “earthy” to do it this way. I am stubborn and can’t be convinced otherwise so that one’s off of the table ;-) Anyway, pictures follow, but here is the recipe/procedure I have been working with.
Ingredients: rye flour, sourdough starter I keep and feed, local spring water (so good here in Alaska), maple syrup, ceylon cinnamon, and sea salt.
To feed starter and get the process going: in a stainless steel bowl, mix very roughly by volume 1 part starter to 1 part flour and then slowly add room temperature water while hand mixing until it seems to be the correct consistency. I pay attention to the ratios and outcome so each time I bake I can improve the consistency of the dough by trying to understand how the ratios of flour, starter and water work together. Let sit on top of fridge loosely covered with a cutting board for 4 hours. (Feeding my starter everyday, I have played around a lot with what ratios seem to work depending on the condition of the starter, although I am still learning and improving.)
Mix more flour into the bowl with a similar ratio and then slowly add room temperature water while hand mixing. Again, let sit loosely covered, this time for 3 hours. (For this particular bake, I believe I added too much water - not runny, but I don’t think the dough was nearly firm enough. I’m wondering if this is the ultimate factor in the gumminess/caving in… Also, I think I should have given it another hour on this second ferment?)
Grease cast iron pans generously with goat milk butter and then flour. Mix in some organic maple syrup, salt and ceylon cinnamon until well combined. Pour into pans until ⅔ full about. Turn on oven to 500F with cast iron skillet at the bottom filled with boiling water. Wait 1 hour. (This time, after 1 hour my starter didn’t rise the final third to the top of the pan, maybe I should have waited longer? Or perhaps too much water again was the issue?)
Place in oven and bake for 10 minutes at 500F, and then drop temperature to 300F and bake for another 2 hours.
Flip out of cast iron pan and place on cooling rack. Brush tops and sides of loaves with goat milk butter. Let rest for 36-48 hours minimum before slicing. (Upon removing from the oven the internal temperature was about 210F with a meat thermometer this time.)
Although initially I thought I may have needed to bake longer than this because of the lower oven temperature, I think I am cooking them long enough because of the internal temperature… This was my first time trying a longer bake time at a lower temperature as before I would bake at 350F-365F. Maybe I need to play around with the first and second ferment times some? I have consistenly had the tops of my loaves collapse so this is nothing new with this variation. Same with gumminess.
This is also only my second attempt using cast iron as before this I was using just regular non-stick loaf pans. I seasoned these pans each 5 times and the loaves slip right out, no problem. I don’t think I’d ever go back to those thin loaf pans.
Finally, I can be slow to respond since I do not have internet (or running water believe it or not) at my cabin out here in Alaska. The pictures also are not going to be very good quality either as I do not have a smartphone or camera - just my webcam on a 10 year old Chromebook. I like to live simply. Warm wishes to you all.


Let's see if I can get these added:
IMG_20240412_135059.jpg
IMG_20240410_201353.jpg
IMG_20240410_201158.jpg
Use less water and see what happens. Enjoy!
I would agree with @Davey1 that trying less water would worth a shot. Pouring into pans sounds more like a batter than a dough.
I also wonder if you have sufficient acidity in the pre-ferment and dough to slow down or stop any amylase attack. I won't suggest checking with inexpensive pH paper, but you need may need lower pH. You could try longer times for the steps to develop the acidity before baking.
You might want to bake at a higher temperature, maybe >375 °F for the second step.
Good luck!
Hi, Polarox.
a few thoughts
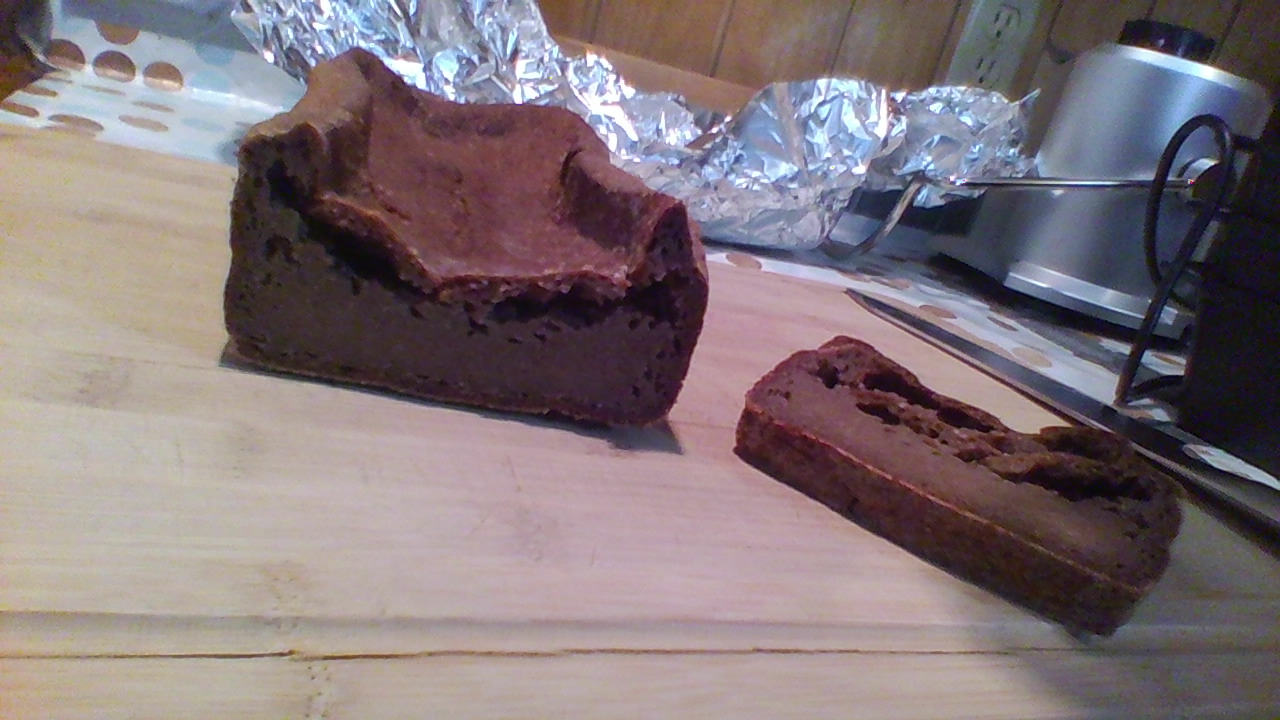
1. from the crumb shot, I'd suspect your loaves are underfermented. One big bubble under the crust & the rest looking quite dense. I'm guessing they look great when you pull them from the oven and then the tops collapse on themselves as they cool.
2. I'd agree with you and my fellow commenters that you probably had a bit too much water in the mix.
3. I know you don't have internet but here's a 100% rye recipe I learned alot from:
http://theryebaker.com/sourdough-tourte-de-seigle/
The idea of prepping the dough in stages, starting with a little sourdough, was quite helpful to me. There are lots of ideas in all the various rye baker recipes.
This was another interesting 100% rye recipe (tho I failed at it, I learned a ton):
https://myvintagecooking.com/finnish-rye-sourdough/
4. I also concur with the idea of a higher oven temp, at least initially. There's a grand tradition in high %age ryes to start at a high temp and gradually bring the oven down.
Enjoy the rye journey!
Rob
You don't mention any experience with wheat but rye is almost totally different. Kudos to living simply and baking by the seat of your pants. It takes a while to get the feel but then it will just work.
Take a look at this post-MiniOven is a rye and sourdough expert here on TFL. Any of her posts will be very educational and practical.
Mini's Favorite 100% Rye Ratio | The Fresh Loaf
Here is another site I just found and wish I had read years ago. The author tends to bury nuggets in the middle of paragraphs but I say they are well worth finding.
The Whys of Ryes | The Perfect Loaf
I am not a rye expert but I have dabbled in it. I do have a few thoughts.
That large hole that sank on the top of your loaf is called a baker's attic or flying roof. It is attributed to several things-overfermenting, poor shaping, enzyme degradation, not enough starter/too much starter. Several things stand out to me in your description.
1. Consistency of your final dough sounds quite liquid/batter-like. It may need to be more like an Irish Soda Bread consistency-"too thick to pour-too wet to knead"-the kind you dollop into the pan and smooth evenly. I would say that this consistency is at the wettest for rye.-depending on how you will be baking it.
2.The purpose of baking is to allow the yeast a burst of activity releasing CO2, set the structure (the starchy gel in the case of rye, gluten in the case of wheat) to trap the CO2 and allow the excess moisture to escape so the crumb is not wet. Maybe others can chime in but 500F>300F seems drastic, especially in black iron pans that hold heat so well.
Speaking of dough:
3. What is the temp of the space on top of the refrigerator? What is your ambient room temp? If the dough is prefermented (you described 1st mix starter/flour/water) for 4 hrs, is it actively bubbling? Did it rise and then fall? Is it acidic (a little burn to the nose when you gently sniff it?).An ideal temp would be about 78-85F and it should bubble actively,poss rise and be at peak and smell yeasty when ready. If it fell and is less bubbly it will not be as effective to raise the subsequent loaf.
4.The next step you describe is using the 4hr fermented pre-dough and mixing in for final dough. It sounds like the dough is very liquid and then this final dough is fermented for 3 hrs on top of the refrig. What does that dough/batter look like? Are bubbles at the surface escaping? Any surface cracking?
5. The final dough has syrup, salt and cinnamon added and then is poured into cast iron pans and allowed to sit for an additional hour but does not rise much before being put into a 500F oven with a pan of water in the oven for 10 min and then lowered to 300F for 2 hrs.
My comments:
Whole rye flour ferments and over-ferments very quickly. It can often be a matter of minutes for a dough to go from bakeable to failure. Rye develops an enzyme reaction that degrades the dough and causes a gummy, thick center and a flying attic. Contributing factors can be a highly wet dough and fermenting too long in a warm environment. There are MANY solutions to this. Here's my ideas. I'm naming your method as Preferment-Bulk ferment-Proof in pan
Reduce the starter amount in the "preferment" so it does not ferment so quickly. Keep an eye on this preferment stage and use it when it is at peak whether that is at 1-2-3 or 4 hrs. This stage can be wetter than final dough. Alternatively, use the same amounts of starter,etc but keep a close eye on its status and use when ripe.
Bulk Ferment and final proof combined stage-mix ALL the ingredients in at this stage BUT WITH LESS WATER ( too thick to pour-too thick to knead ) and put into pans. Immediately after putting in pan, use a chop stick or small stick to "dock" it so large bubble from pouring are broken up. Ferment until bubbles just start forming at surface or cracking of top is apparent. It won't take as long as you think and can overferment easily.
Rye dough does not get deflated and allowed to rise again like wheat bread. Especially 100% rye dough! With rye, every bubble is precious and the goal is to keep all the gas in the dough. Eliminate handling the dough AFTER fermenting to maintain as many gas bubbles as possible. So go from mixing bowl to final pan.
Allow to rise but keep an eye on the dough. When it starts cracking or if bubbles start escaping-it is ready to bake.
Put into a hot,steamy oven and turn down temp. I would do 450F down to 375.
Happy baking!
You mentioned that you don't have ready access to the internet but I remembered a YouTube video that was mentioned here on TFL by @Abe. I watched the video and followed her instructions for Non-Recipe Sourdough Rye. I was pleased with my results. You might want to take a look at her video:
https://youtu.be/TkVdO-9HLVU?si=sWiMOiHFOwklqoEM
Rye needs time to dry out/redistribute moisture after baking. Suggestion: wait minimum 4 hours, up to overnight, before slicing.
Use 67% hydration and see if you like the results. Your description sounds like too much water.
Bake the 67% hydration loaf at 430F for 50-60 minutes.
Thank you all very much for the suggestions, especially clazar for the detailed response. I don't have much time to type right now but have saved this page, the linked pages, and the video for further review. Will be baking again next week and will take all of this feedback into account. Much appreciated.
Baking with Rye is very different than baking with wheat.
1) rye minimal amount of gluten compared to wheat
2) Rye contains amylase which if not controlled adequately will destroy your bread.
3) Rye contains pentosan that bind water and makes the flower very thirsty in different to work with compared to wheat.
When this is said I find write quite easy and forgiving to work with.
I have baked sourdough rye bread using 100% whole grain, freshly milled Rye flour from any years. I most often use a recipe, but often add a scald of some Rye flour in order to put some sweetness and boldness to the flavor of the bread.
En terms of your problems: looking at the crumb of your bread and the shape of your bread I'm quite certain that your problem is the effects of the amylase. Why is as I mentioned above rich in amylases. If these are not Control the amylases will eat the starches in the rye flour, rendering the bread wet and gummy er den some instances you have a large whole in the middle of the bread after baking. You can Google "Starch attack" on the Internet and read more about it. I don't think you have too much water in your bread but I could be wrong, it's hard to judge from the pictures you've posted.
You control the amylases by making sure that your dough is adequately sour and by reducing the fermentation time.
Re. Reducing PH of your dough: having read a lot about rye sourdough on the internet I have concluded that you need somewhere between 35 and 70% rye sourdough starter in your rye bread dough. I either make a large portion of starter which I leave to ferment for at least 36 hours before using or a utilized the "3-step demolder method" with which I can produce a very sour sourdough over a 24-hour period. Since you feat your sourdough everyday you can collect the discard over a week and keep it in the fridge. After a week in the fridge it is adequately sour to control the amylases. Many people in my country use this very sour wheat sour dough for baking rye sourdough bread.
Re. Reducing the fermentation time: when fermenting rice sourdough the optimal temperature is 31 to 34 degrees Celsius ( for 89 to 93° f). I have some recipes that require fermentation at high temperatures, but not all recipes will work with fermentation at such high temperatures.
II have managed through experimentation with rye baking, to make a rye bread with a soft crumb. As I mentioned above Rye contains pentosan which will bind the water in the dough. A lot of people will say that once the dough has been stirred you should put it in a tin, a let it rise and bake it. If you however stir it well and give it a second rise in the tin the crumb of the bread becomes much softer. I think the water that is liberated from the pentosan is unable to become bound to the dough again and there for makes the bread softer. We like a rye bread with a soft crumb so I often utilize this method when I bake.
Like you I bake with a high temperature initially. I hate my oven to 275 degrees Celsius or 520 degrees fahrenheit. When I put the bread into the oven I reduce the temperature to 195 degrees Celsius 383 degrees Fahrenheit and add about two hundred ml of boiling water to the bottom of the oven to create steam. After 30 minutes I insert a thermometer into the core of the bread and finish baking the bread to a core temperature between 93 and 95 degrees Celsius equivalent to 199 to 23 degrees Fahrenheit.
Rye bread made with 100% whole grain rye flour has a soft sticky crumb and should not be cut for at least 36 hours after baking. I cool off the bread and put it in a plastic bag while the crumb matures. Once the bread is ready to be cut it can be frozen without problems.